

Here we will keep you informed about last news, events, and other stuff related to Licode and WebRTC.
Hi all!
Today we are going to briefly show you how to configure your Licode deployment to use Nginx and secure HTTP connections for both the application and the socket.io server. In the following figure you can see the configuration we want to deploy:
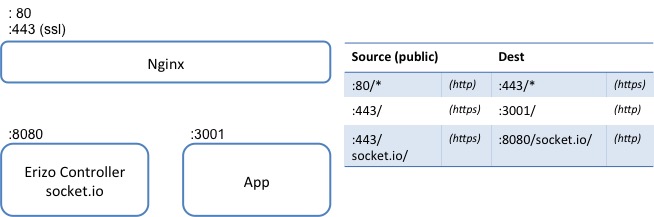
As you can see, clients connect to the application and to the socket.io server using the HTTPS port (443). Then, Nginx redirects the requests to the HTTP ports (3001 and 8080 respectively).
Configuring the scenario is very simple. You have just to install and configure an instance of Nginx and to introduce a small change in Licode’s default configuration. The following steps explain how to proceed with this configuration in Ubuntu 14.04):
sudo apt-get install nginx
/etc/nginx/sites-enabled/) or by creating and enabling your own one:server {
listen 80 default_server;
listen [::]:80 default_server;
server_name {your_server_name};
return 301 https://$server_name$request_uri;
}
server {
listen 443;
server_name {your_server_name};
ssl on;
ssl_certificate {path/to/your/ssl_cert/file};
ssl_certificate_key {path/to/your/ssl_key/file};
ssl_session_cache shared:SSL:10m;
ssl_ciphers !RC4:HIGH:!aNULL:!MD5;
ssl_prefer_server_ciphers on;
ssl_protocols TLSv1.2 TLSv1.1 TLSv1;
location /socket.io/ {
proxy_pass http://localhost:8080/socket.io/;
proxy_http_version 1.1;
proxy_redirect off;
proxy_set_header 'Access-Control-Allow-Origin' '*';
proxy_set_header Upgrade $http_upgrade;
proxy_set_header Connection "upgrade";
proxy_set_header Host $http_host;
proxy_set_header X-Real-IP $remote_addr;
proxy_set_header X-Forwarded-For $proxy_add_x_forwarded_for;
proxy_set_header X-Forwarded-Proto $scheme;
proxy_set_header X-NginX-Proxy true;
proxy_read_timeout 86400;
}
location / {
proxy_pass http://localhost:3001/;
proxy_set_header Host $host;
proxy_http_version 1.1;
}
}
Note that you have to modify the text in {your_server_name}, {path/to/your/ssl_cert/file} and {path/to/your/ssl_key/file}.
licode_config.js file. You have just to change the following parameters:[...]
// This configuration is used by the clients to reach erizoController
// Use '' to use the public IP address instead of a hostname
config.erizoController.hostname = ''; //default value: ''
config.erizoController.port = 443; //default value: 8080
// Use true if clients communicate with erizoController over SSL
config.erizoController.ssl = true; //default value: false
// This configuration is used by erizoController server to listen for connections
// Use true if erizoController listens in HTTPS.
config.erizoController.listen_ssl = false; //default value: false
config.erizoController.listen_port = 8080; //default value: 8080
[...]
As you can see, erizoController is still listening on 8080 port but clients will try to reach it on 443 port using SSL. Then, Nginx will redirect them to the correct port based on the /socket.io/ path.
And… that’s all. Enjoy Licode!